Friday, July 19, 2013

Fun day at home

Lazy days of summer..... As a stay at home Mom, I try to have 1 or 2 days a week where we stay home. My girls (ages 3 1/2 and 5) could get out everyday and love being very social. I, on the other hand, would rather stay home most days. Not that I am not social, I LOVE my friends/ adult conversation time. I just prefer to get out without 2 kids in tow. It is very exhausting. The constant questions and bickering, the reminders on my part of how to behave, the waiting (my youngest is sssooo slow), and the in and out of dreaded carseats. Also just the need to constantly watch them so they do not get hurt but also get your things (shopping) done. We women are the best at multi-tasking!

So on days we stay home I want to give them something to do other than TV or computer time. For me that is CRAFTS! I love crafts. I also like anything that gets their little creative minds rolling. On a side note, I am a big component on letting your kids get bored once in a while and allowing them to come up with something to do on their own. I love to spend time with them but I am not going to be their complete source of entertainment every minute, that's not how the real world works.

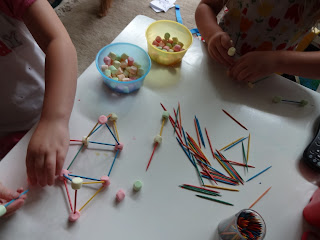
So on this particular rainy summer day we made crafts. I had bought a few inexpensive items for their enjoyment. One was painting window art, which I did not take pics of. The other was creating structures out of mini marshmallows and toothpicks.


Not only was it tons of fun but we were able to talk about what shapes they could make. In addition, to a yummy snack to eat at the end! I would say the spent 1 maybe 2 hours playing. That's worth it to me.

Wednesday, July 17, 2013

Tie-Dye Your Summer!!


 I will be demoing Tulip's 1 step tie-dye at Hobby Lobbys the next 2 Saturdays! This Saturday, July 20th in Plano (off Legacy) from 11-1 and in Frisco (off Preston) from 2-4. Next Saturday, July 27th in Plano (off W 15th St) from 11-1 and in Allen (off Central Expwy) from 2-4. Stop by and see the new packaging and talk to me about some fun summer projects to create!!
www.tiedyeyoursummer.com. It's going to be fun!
 
Also enter to win a chance for a few mini iPad or a Tulip tie-dye party for you and your friends.


My favorite technique is the Ombre (fading technique). The pictures do not do it justice.
I took 1 color, prepared the mix, squirted on the bottom third of the shirt. Then I poured out the dye till I had a quarter left in the bottle (I poured into another bottle to save for another project). Filled my original bottle back up with water (to dilute the color), then squirted the middle section of the shirt. For the last upper section I poured all the color out but just a tiny bit, filled up the bottle to the top with water and squirted on the top section. You will get the hang of how much color contrast you like. In these I should have made the middle a little lighter and the top almost white with a blue tint, but that is my preference. Cover the shirt with a plastic bag and let sit for at least 8 hours, longer for more intense colors. When ready, rinse shirt till water runs clear. Then wash separately.
 
For the 2nd shirt shown, I did a mini bulls eye in pink. I pulled up a tiny section, rubber banded it off and added pink to it before I started with the blue. It is for my daughter and turned out super cute in person.
 
 
Another cool technique is stripes. I folded the apron from the bottom up (accordion style) and used binder clips to keep together, you could use rubber bands also. The binder clips give a good width for stripes.  You add the dye only to the folds of the white sections where the clips are not. Let set over night (at least 8 hours), unclip and rinse in water till it runs clear. Then wash separately. I made red stripes to a bottom of a shirt (up to the arm pit) and added several bull eyes all over the top with blue for a cute fourth of July "flag" shirt. I didn't have pictures of it since it is in storage but will try to add one later.
 

Tulip has all the instructions on the packaging that are super easy to understand and follow. Tulip is my favorite for tie-dying, they make it so simple. They also have several technique ideas to try or you can research the internet for more.

 
Have a fun and colorful summer!!!


Saturday, July 6, 2013

A Family Move

We have moved.........to Texas! The last 2 months have been a worldwind. My amazing Hubby has been courted by several jobs in the last year in more locations than just Texas. We have always wanted to get back to my Family in the Dallas, Texas area. So my talented Husband procured a new job and we were off. It actually happened quite fast. He started a new role and I started the house search. Then packing began. With DH in Texas, the kids and I in Colorado, lets just say the packing on my end was not the most pleasant. But we did it and all our belongings are in 2 Pods now residing north of Dallas till we find a new home. The new home, well that is a whole other ballgame. We found a home that was just a few weeks from being complete. We had the inspection 2 weeks to closing and a hiccup in our plan happened. The inspection was not good. Enough so that we backed out of buying the home. So we searched again and have made a offer on another house and hope to close mid-July. In the meantime we are staying with my Mother and my kids are in heaven being with their Grammy.

We love Colorado and will always cherish the time and friends we have made over the last 3 years. It is a terrific place to raise a family and I will miss the beauty of the mountains and the weather (minus the months of never ending snow). It was a hard decision but our hearts were always in Texas.

Can't wait to have the opportunity on designing a new craft room. Trust me that I will share picture all along the way. Then once we settle, let the crafting begin!

E


Monday, July 1, 2013

DIY Sugar Facial Scrub

 
You will need the following:
 
1/2 cup fine sugar or brown sugar
1/4 cup Coconut Oil (liquid form)
1 tsp dry milk
5 drops of favorite essential oil *see note below
Drop of food coloring - if desired
Jar to store in
 
Use twice weekly to combat that dead skin.
 
Additional notes:
I prefer a mix of Melaleuca/Tea Tree oil and Lavender.
Tea Tree combats acne and Lavender sooths the skin. Using Coconut oil has many benefits over other oils as it is antimicrobial, an antioxidant, antifungal, antiviral, antibacterial, and has soothing qualities. Not to mention it is a great moisturizer and does not clog pores. Rub it on!
I used regular sugar my first round and it is a little to rough for my sensitive skin. If you can find fine sugar or go with brown sugar it still works as a great scrub without the harsh roughness.
Make a bigger batch to give away. These make great teacher gifts or just fun for friends.


I love the benefits of essential oils and am trying to live more chemical-free. You will be seeing more of my recipes soon on my quest to stop buying expensive body and home products and making them all homemade. I am allergic to sulfites which are found in so many products and I hate reading the labels and not knowing what over half the products are. So far I have been so pleased with everything I have made. For essential oils, find a quality therapeutic grade product. They are a little more expensive but well worth it over store bought oils that boast "100% pure". Therapeutic grade oils give you greater and more consistent results. I get all my Essential Oils at wholesale at www.mydoterra.com/eclineoils 
 
Enjoy, E


Friday, June 7, 2013

DYI Powder Dishwashing Detergent

I have been on a quest to become more green. Not only do I feel that it is safer and cheaper, it is fun to make. Here is a simple Powder Dishwashing Detergent.
 
Supplies:
2 cup Borax
2 cup Washing Soda
1/2 cup Kosher Salt (1 cup for hard water*)
 
4 packages Lemonade Kool-Aid
(unsweetened and lemonade kind only)
or
1/2 cup of citric acid
 
20 drops Lemon essential oil or other scent (optional)
Container to store in


I found this container at the Goodwill and liked it because it already has a spoon attached. You just dump all the ingredients in and stir or shake it.


You can cut this recipe in half to try a smaller batch. Works just as good if not better as the store bought ones. *I do not have hard water in Texas but when in Colorado I would have some film on my dishes. Kosher salt is used to soften water so try adding more to the mix. I use distilled white vinegar as a rinse aid and it also will help some with the hard water but if not then you might want to stick to a liquid detergent. I will be posting one in a few weeks, once I have tried it out for a while.
 
Thanks for looking!

Wednesday, May 1, 2013

Tree Card

Found this SVG cut file on the internet and had to try it out on my Sizzix eClips.

Cut the tree from any color paper. Pop dot it onto a card. Then take the leave cut outs (negative) and water color them or cut out design again with fun paper and glue on.

Monday, April 1, 2013

Glass Bottle Cutting

Have a few glass bottles (wine, liquor, etc) sitting around? Well I have a fun project and what better way to recycle things around the house.

This should take you to the video of me demonstrating how to use the bottle cutter I prefer. If not, search for Elizabeth Cline, Glass Bottle Cutting on Youtube and hopefully it will pop up.
http://www.youtube.com/watch?v=A4K7gfg77Gs

I have made waterless planters, vases, and brush/pen holders out of these. Add a tall candlestick holder from goodwill to the bottom and you have a really nice homemade candle holder that costs tons at the store. A quick search on the internet will show many other fun projects, like a wind chime. Have fun with it.


Saturday, February 9, 2013

Doily Table Runner


I have been wanting a doily table runner for a while now. Saw one on Pinterest once and have loved it ever since. Only thing, I did not have any doilies. Low and behold, my Mother (without even knowing I wanted one) surprised me with one made from some of the doilies she has collected over the years. Some from travels overseas and a few from my Grandmother. The original she made was way to big for my table though so we redesigned it to the picture shown. I wanted it to show some of the wood underneath and not be to cluttered or to long. I will say, the picture does not do it justice. I love the look and very easy to make. Layout on the table your favorite doilies how you like. Slightly over lap and then tack them together with a little needle and thread. Easy Peasy!

I have many left from the original and can't wait to make a few other projects with them.

Enjoy and get out there and start crafting!