Monday, October 8, 2012

Scrapbook retreat in the mountains

How I love getting away from the norm. My Scrapbook group (Douglas County Scrapbookers) had our Fall retreat in Estes Park! It was 4 days of bliss. Want to see my fun projects I finished??

 
A few earrings and a bracelet. I love using decorative trim to make things. You can see how I cut out just the pieces I wanted to make the earrings and bracelet. Not only is it pretty but also light weight. Watch for an upcoming post on paper earrings I have in the making.

A cute mini album and a scrapbook page from our spring retreat, just to show off a few things. I did about 20 pages along with the other things. If you have not started to notice, I love all crafts and would I consider myself a scrapbooker? Well, yes, by nature, but I am more of an all around crafter. 
I can not wait till our next retreat!
 

Watercolor with Tulip Fabric Markers


Watercoloring with fabric markers is a technique I saw at CHA and fell in love with. Pattie Wilkinson over at Pattiewack.com is amazing. One of my craft groups I am involved in just had to try it out. Here is the fun we had. I would say watercolor with fabric markers is a hit.


 This is me drawing and the finished shirt. For my little dancer!!
 
Another one of my playing around.

This was my 1st try before the group get together. A little to much water made the lines bleed out of the lines but it still ended up looking pretty.
You do not have to be an artist to do this. Take any image off the internet, stick it in the shirt, and then trace with the markers. Go slow, trace small areas and add water with a small paint brush, then move to another section. Easy as can be!  Check out this video on how to: http://www.youtube.com/watch?v=Nzgkul2zkxw
 
Happy Crafting!
.

Tuesday, October 2, 2012

A Little Art

Some Mix Media to show off, my new favorite craft. This is a Silhouette I cut out of canvas, added silk ribbon as hair, hand sewn on. Background is ribbon misted with Tattered Angels Glimmer Mist and hand sewn for a ripple effect on a Burlap canvas. Canvas is from Canvas Corp, all Ribbon from May Arts. Shells from the beach of Higgins Lake during our vacation in Michigan.

1st Day of School

 
My Girls on their first day of Preschool.
August 14, 2012
 

A few lunches from their 1st week back.


2012 Summer CHA Chicago


Yeah! This summer I had the pleasure of attending the Craft and Hobby Association Convention in Chicago with my friend, Designer, Kendra Wiggins (her blog is www.ScrappinCricut.org). We had a blast.

We helped the majority of the time with the Canvas Corp booths (Canvas Corp, 7Gypsies, and Tattered Angels). Here is the behind the scenes before CHA was open to everyone. It was a mad rush to the finish but amazing to see it all happen.
 
Here I am at the I Love to Create booth, where I made the flower pin on my shoulder, in addition to a screen printed bag. The shirt I am wearing is a Spellbinders t-shirt they handed out to win free stuff if they see you wearing it during the convention. Well I am not going to wear just a t-shirt, I had to spice it up with some scissors at the Westcott booth and some Tattered Angels Mist. Hard to see the cut designs on the sides in this pic.Lets just say, Spellbinders owner loved it so much she GAVE me a Grand Calibur machine!!


A pic of Kendra at the Ranger Booth checking out the distress inks, if you look close that is Tim Holtz in the background! Also Kendra and I at a wire class we took.

 
This is a dress our roomie, Candy Rosenberg (at candyscraps.typepad.com/ and www.scrapnart.com/) made for the dress competition, to be featured in Cloth, Paper, Scissors Magazine. Made from paper, ribbon, and wire, Isn't it amazing. She is sssoo talented, and YES, she won!! You can find her stuff all over the place, she is a designer for many companies. I was honored to get to hang out with her all week.
 
Here is the Tattered Angels booth that we helped set up. Kendra is doing a demo. See all the 6x6 canvas's in the booth, I hung all those, LOL. I am a perfectionist and had a tape measure making sure they were all perfectly spaced.   

This is the Canvas Corp group! We took a trip down to the Chicago Navy Pier after a day of hard work. It was an adventure to say the least. Something I will remember forever.

All Good things must always come to an end. We packed all 3 booths (Canvas Corp, 7 Gypsies, and Tattered Angels) up in less than 3 hours.
It was an amazing trip. I learned so much and meet such fabulous people. Not to mention all the wonderful things I recieved!!

Misc Cards

A day of fun at the house with a good friend. We made a few cards from a terrific SVG cut I found on the net. We used my Sizzix Eclips to cut it out.
 

Suncatchers using Pony Beads

I thought this would be a fun activity for my girls and their friends. 
 There are many tutorials on the web for these.
 
What you need:
Pony Beads
Metal pan
Oven preheated to 400 degrees
 
The finished product.

Here are the kids working hard at their designs.


I had mini heart muffin pans on hand that I used. They worked out great. You can use metal round muffin pans or any metal pan. Once the beads are placed how you want them, carefully transfer to oven. In a 400 degree oven it will take about 25 mins. Keep a watch on them just to make sure. It will depend on the size, etc. Once they look melted together, take out of the oven and let them cool before tapping them out of the molds. PS. It has a terrible smell while melting. I opened my windows and it cleared up fast. I would not recommend using the metallic Pony Beads, I have heard they smell worse and smoke. You can also do this on the grill outside, and it takes less time if you do (I have not done this thought).
 
Use a hand drill to make a small hole at the top so you can hang with a string.
These would make great Grandparent gifts.
 

I'm Back

So yes, I have been gone a while now. It was a busy summer and then start of school year. Here is a few things I have done in the last 2 or 3 months to catch you up.


Friday, June 22, 2012

Beverage Sleeves

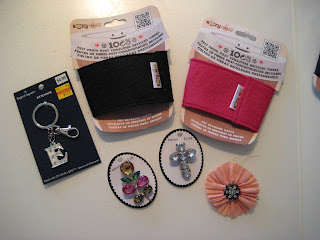
Hot or Cold Beverage Sleeves


Turn these inexpensive items into an awesome gift.
I bought the embellishments at Hobby Lobby in the clearance section.
The felt sleeves I bought for $2.50 each at Joann's.
The flower I sewed right on, the others are pins.
Talk about fast and inexpensive.


You could buy a cute mug to put it on before giving it away but I liked just leaving it on the original package. If you sew I am sure making the sleeves yourself would be fast and easy too.

Scrapbook Sign


Had to share my sign I just made to hang in my Scrapbook room. I had a car decal I wanted to use for years now so I painted a wood sign and then stuck it on. Then added a few other things (flowers and a pin). 

Friday, May 18, 2012

Marshmallow Fun Faces Snack


They're super easy and fun to make. All you need is food coloring, a thin paint brush, icing (if desired for hair) and of course marshmallows. For little ones I recommend using the food coloring markers.


 Idea and pictures from:
 

My girls hard at work

Ours did not turn out as pretty as Colormekatie (above) using edible markers but was fun to make and eat!!


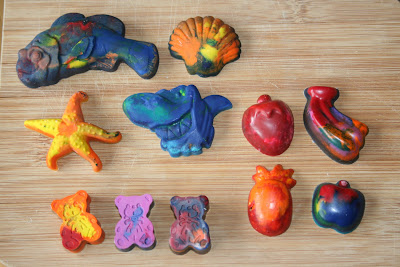
Fun Crayon Shapes


Directions

New or old broken crayons (same brand crayons look the best but not required)
Silicon molds/ ice cube trays (IKEA, craft stores, and many other places have cute shaped silicone molds)

  1. Take all the crayons you can find. Have your kids peel off the paper.
  2. Break up the crayons into small pieces that will fit into your molds. Kids can break them up but you might need to go back with a knife for smaller pieces.
  3. Have the kids put the pieces into the molds. I like the rainbow effect but 1 color works too.
  4. Put filled molds on a baking sheet and into a preheated oven at 250 degrees. Melt between 15 to 25 minutes. Watch closely as oven cooking times vary. Once all pieces are melted remove carefully.
  5. Let cool completely before gently removing crayons from molds. You can speed up the time by putting the molds into the freezer.
Note: You can also use the hard plastic candy molds but you need to melt the crayons in a pot or in the microwave and then pour into the molds. You will not get a rainbow effect so I suggest using 1 color at a time in this process. Please remember you can not put plastic candy molds in an oven, they must be silicone for oven use.

This is a fun project to get the kids involved and make awesome gifts.


Paper removed and chopped up


Placed in the molds


Girls watching the melting


Right out of the oven


Finished Crayons
Bats for Halloween class gifts

Tuesday, April 10, 2012

Stick Pin Swap

I LOVE my scrapbooking group. One of the fun things we do are swaps, were people sign up and we all make a # of whatever the swap is for, and then exchange. This is for my Stick Pin swap, I made flower stick pins to try something other than just beads. Then I stuck them in cork topped glass jars to look like flower pots. I hope they like them.


To make decorative stick pins all you need are corsage pins, beads, bead glue, and flowers or other embellishments (if desired). When you put the beads on just add a dab of bead glue to hold and your finished. Add to scrapbook pages or home décor. It's that simple!

Scary Bunny?


Yes, I am that parent who forces my kids to take pictures with whatever character of the season is out. I am a scrapbooker for pete sakes! You would think they would LOVE to get pictures with the Easter Bunny since it is a BUNNY. Oh but no, not even a bunny. Of course at second glance this is a scary looking bunny and to quote a favorite movie, “with big pointy teeth”!! You would think they could make a cute bunny. I mean seriously, what animal has white pupils!

Thursday, April 5, 2012

Ivy Teacup Gift


I stole this idea from a friend of mine. She used Paperwhite flowers but I love ivy so used it instead. I made these for my daughters' preschool teachers. If you have not been to Crafting Rebellion it is a must! She has great ideas and is an amazing Lady.

Here is a link to her Paperwhite tutorial:
Crafting Rebellion - easy paperwhite gift

Glass Tile Necklace


Here is a glass tile necklace I made with a picture of my 2 girls. It looks better in person. I really need to get a better picture of it. I love to make these. They are so simple and make wonderful gifts.

Tuesday, April 3, 2012

I'm on an adventure.

Here we go, my very own blog. I love my Family and I love anything crafts, so I wanted to combined them. This is all about my little Family and the funny things they say or we do. It also has the crafts I do to quench my craft addition. Hope you get inspiration or at least a laugh. Elizabeth